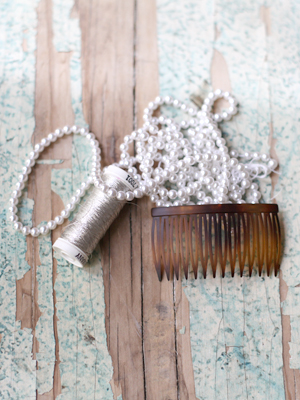
Hair Comb
Even if your hair is elaborately styled in a braid or twist, you can still add a decorative comb to highlight your beautiful updo.

Supplies:
• plain hair comb
• metallic thread
• strong glue, like E-6000
• pearl beads

1. Tie the metallic thread into a knot around one end of the comb's base. Do not cut the thread from the spool. Keep the thread connected to the spool the whole time.
2. Loop the thread around the base, between the first two fingers of the comb. Once you have a solid amount of thread on the comb, begin looping the thread in an X-like pattern, pulling the thread through one of the fingers and crisscrossing it across the band, and pulling it back through the next finger of the comb. Do this repeatedly, until you cannot see the original color base of the comb.
3. When you cannot see the original base of the comb, move onto the next finger of the comb. Continue the X-pattern on every two fingers of the comb until you have reached the other end of the comb. When you get to the end, cut the thread and tie it multiple times around the base.
4. To cover any spots of the original comb, especially at the ends, and to make the comb more interesting, add a few pearl beads to the comb. Use strong glue, like E-6000, to attach the beads to the comb. Wait 20 minutes for the glue to dry before putting it in your hair.

When it comes to prom accessories, many girls forget about their hair. Even if you have a stylist do your hair, you can always add an extra romantic touch. From fresh flowers to pearl bobby pins to decorative hair combs, there are tons of options when it comes to dressing up your hair.
Studded Cuff

Supplies:
• teal ribbon
• strip of studs
• needle and thread
• belt clasp
• magnet
• strong glue

1. Cut a piece of teal ribbon so it's a few inches too large when you wrap the ribbon around your wrist.
2. Cut the strip of plastic studs (you can find these at most fabric stores), so it's a tiny bit smaller, like 1/2-inch, than the teal ribbon.
3. Place the studded strip on top of the teal ribbon and center it. Sew the two pieces together at the places where the studs are attached to one another.
4. Once they are attached, loop one end of the ribbon through the belt clasp, and secure it underneath with a strong glue, like E-6000.
5. Wait for the glue to dry, then pull the other end of the ribbon through the other side of the clasp. Try it on your wrist. Once you have found the appropriate length, cut off any excess ribbon underneath, but leave at least 1/2-inch to run through the other side of the cuff.
6. To secure this side of the clasp -- and allow you to remove the cuff when you'd like -- attach a magnet (with a strong glue) to the underside of the cuff, and another magnet to side of the ribbon that pulls through the clasp. The two magnets should line up and connect to hold the cuff in place.

If you're wearing a large statement bracelet like this cuff, try to balance out your other jewelry. Don't overload your look with a large necklace, dangly earrings, or over-sized cocktail rings.
No comments:
Post a Comment